Software Dependencies
You will need the following software installed on your computer before starting with the development.
| Name |
Description |
| Nginx |
Nginx will be used as our web application server. However you can use others like Apache or another PHP compatible web app server. More info on the installation of Nginx can be found here |
| PHP-FPM |
This one is needed to run the PHP scripts. Any version above 7.x.x should be ok. Probably also versions below 7. Installation instructions can be found here |
| Node |
Any version above 14.x.x should be ok. Installation instructions are here |
| Npm |
Installation instructions are here. NPM 8.x.x. or above. |
| Gulp |
Download link. Version 2.x.x should be ok. |
| Composer |
Can be downloaded from here. Version 2.x.x should be ok. |
| MariaDB or MySQL |
MariaDB can be downloaded here. If you would like to use MySQL for commercial purposes, verify its license. Seems it is no longer free for commercial purposes. |
Zip Content
The downloaded zip contains the folder structure as explained below. Suppose you created a project called
mysite and domain
mysite.com. Two folders are in the zip with these names.
| Name |
Description |
| db |
Contains the db.sql script compatible with MariaDB or MySQL. Connect to your database server, open and run it with your favorite SQL editor. You can also use MySQLWorkbench, which is free and can be downloaded here |
| html |
Contains a folder which should be publicly exposed to the visitors of your website. On Linux Nginx serves files by default from /var/www/html. Just drop the mysite.com to /var/www/html/mysite.com. The prebuilt system expects the folder to end with the html, otherwise the destPath in gulpfile.js needs to be modified. |
| nginx |
Contains a sample virtual host config file |
| mysite |
This one should not be publicly visible for security reasons and should be placed two folders higher from /var/www/html/mysite.com. In this case to /var/www/mysite |
Configuration steps
These are the steps needed before starting with the development.
- nano /etc/hosts and add the following line to the hosts file 127.0.0.1 dev.mysite.com
- Create a virtual host in nginx. Google the instructions how to create one for your OS. The nginxVirtualHostConfig.txt which comes in the zip can be reused quickly by replacing the values marked inside the #TODO
- Restart the Nginx.
- Open the mysite.com/index.php and modify your site's title
- In Terminal navigate to mysite.com and execute This will allow the uploaded files to be saved under the files directory, otherwise you might be receiving errors during file uploads.
- Navigate to mysite, open package.json and modify the value for the author key
- In Terminal navigate to mysite and run npm install
- Run gulp. Here you might get some errors about missing gulp dependencies located in gulpfile.js. If e.g. gulp-uglify would be throwing errors then install it by using one of the commands npm install -g gulp-uglify or npm install --save-dev gulp-uglify or google the errors. Similar goes for gulp-concat, gulp-clean-css, del, gulp-less, gulp-append-prepend
- Run composer install
- Visit the Mailjet website, register and get the key and the secret for your domain. Mailgun, which comes with the prebuilt system, can also be used. If you wish to use another mailing service, then replace the occurences of the Mailjet code.
- Also on the Mailjet website, make sure to add your domain under Sender domains & addresses. Make sure its status is Active.
- Enter the key and secret in the mysite/mail/mailjet/MailJetConfig.php
- Open the mysite/common/Executor.php and modify the database's DEV environment settings YOURDEVDBNAME, YOURDEVUSER, YOURDEVPASSWORD
- If you open https://dev.mysite.com/contact you will notice there is the Google Captcha. You can either set it up or delete it.
In index.php the following lines concern the Captcha <script src="https://www.google.com/recaptcha/api.js" async defer></script> and
<div class="g-recaptcha" data-sitekey="YOUR_SITE_KEY"></div>. The ContactController.php needs this value replaced YOURCAPTCHASECRET.
You receive these values from reCAPTCHA Checkbox
- Open in the browser https://dev.mysite.com/
- Try to register
- The activation e-mail was sent to the email provided in the registration form. Click on the activation link.
- Login with your credentials
- Now you can test the CMS, modify the colors, fonts, layout as you wish, add new pages. You have full control.
Create a page manually
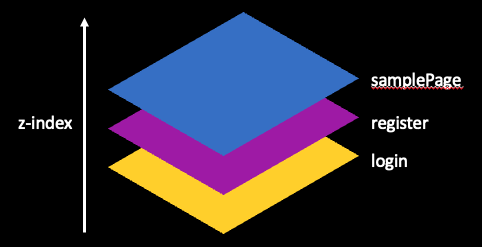
Pages in pBullet are represented with sections. They are stacked on top of each other on the z axis as depicted below. The whole html gets loaded after the first response. Afterwards only JSON is used for communication between the browser and the server. This is called the single page application (SPA).
Below we will use a section with the id="samplePage" as an example. To create a page you will need the following:
| Name |
Description |
| section |
Add a new section with the id="samplePage" in the index.php. |
| route |
Add a new route to routes.js Routes are composed of 5 properties described here |
| samplePage.less |
This one will contain all your CSS related to this page written in LESS. It should start with section#samplePage. Don't forget to include the z-index Consult an existing sample to see how it should look like. It should be imported to master.less if you will be creating the page outside the CMS otherwise to masterCms.less |
| samplePage.js |
This one will contain the Javascript related to this page. It should be included in the gulpfile.js. If you will be creating the page outside the CMS add it inside the function js() otherwise to jsCms(). |
| SamplePageController.php |
Optional. Include it if your page will need some processing on the server side or access to the DB. Simply copy an existing controller from the folder mysite/controller. Make sure the controller extends the AbstractController class and that you modify also the name of the class inside the controller. Controller has the execute method which is invoked based on the act and subAct params received in JSON request. Modify these according to your wishes. Controller must be registered inside the mysite.com/backend.php inside the $listOfActions and properly included with the require_once statement. Controller resolution is described here |
Before starting with the development run these two commands in Terminal
The first one will build fresh javascript and css files under the
mysite.com/js/dist and
mysite.com/css/dist. The second command will listen to any changes you make to
js or
less files and automatically rebuild them.
If you add a new js or less file to
gulpfile.js or
master(Cms).less make sure to
Ctrl + C to stop the
gulp watch and redo the two commands to pick up the added file.
Routes
| Name |
Description |
| name |
This is just a name of your route. Assign something meaningful e.g. samplePage. Router can display pages based on the route name. |
| path |
Links can be created with this path e.g. /samplePage. If you have a link with this path, if clicked, it will open the corresponding page (section). It will also appear in the address bar. |
| sectionId |
This is the id of the page (section) you want to display once the link with this path has been clicked or if programmatically the router moved to a route with this name. |
| pageTitle |
The title which will be set when this page (section) will be shown. |
| initFunction |
Optional. The function which will be invoked every time when moving to this page. Specify a meaningful name. If set, this function should be included in samplePage.js. |
Controller resolution
The following two parameters can be sent inside the JSON request. They are used to resolve the controller and its method passing the whole JSON to the method. Some of them are already used by the framework.
| Name |
Description |
| act |
Stands for action. It is used to resolve the controller e.g. act=login will resolve to the LoginController |
| subAct |
Stands for sub action. It is used for method resolution inside the controller once the execute method is invoked. The following subAct values are used by the framework: add, edit, del, list, showItem, oneToMany |
Request response cycle
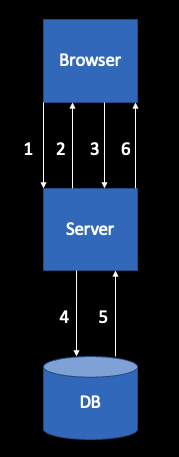
Below is the typical flow between the browser and the server.
- Browser sends the request to the server
- Server responds with the full html from index.php. From now on only JSON is sent between the browser and the server.
Browser executes the following code which loads the registration page inside the initModules. If you wish to load another page, simply replace the "register" route as the input to the routerModule.
onLoad.js
$(document).ready(function () {
addEventHandlers();
initModules();
 ... });
- After the user clicks on the submit button, the browser sends a JSON request with act and subAct params to the server. The server resolves the controller from the act param to the RegisterController and invokes its execute method. Inside the execute the subAct will resolve in the invocation of the "register" method.
- Inside the register method the server will insert the user to the DB.
- The DB will provide the response to the server.
- The server returns the JSON response.
Debugging
To debug you can use one of the following techniques.
- Uncomment these lines
backend.php
error_reporting(E_ALL);
ini_set('display_errors', 1);
Configure XDebug with your IDE
- Use the Inspect tool inside the browser to troubleshoot JSON requests and their responses, javascript calls, css layout and html structure. Right click in your browser, Inspect
Before going to production
Comment out the below two lines
backend.php
//error_reporting(E_ALL);
//ini_set('display_errors', 1);
Adjust the production host, dbname, user and password values in this line of code
Executor.php
$this->connection = new PDO('mysql:host=YOURDBIP;dbname=YOURDBNAME', 'YOURUSER', 'YOURPASSWORD');
Set the DEV and PROD domains
Executor.php
private static $DEV_DOMAIN = "dev.YOURDOMAIN";
private static $PROD_DOMAIN = "YOURDOMAIN";
Uncomment the following occurences
gulpfile.js
//.pipe(uglify())
Search the whole project for the occurrences of
TODO and replace where it makes sense excluding external dependencies
Add the Google Analytics or other tracking script to index.php
Inserting files in database
By default the uploaded files get created in the filesystem under
mysite.com/files. This part is done here
YourController.php
$filePropertyNames = ["..."];
$this->handleFiles($this->jsonObject, $filePropertyNames);
For better loading performance it is recommended to upload them on another server like the CDN or multiple servers.
However if you really wish to insert the files in the database then comment or delete the two lines below and the $dataTypes must include PDO::PARAM_LOB for each uploaded file.
YourController.php
//$filePropertyNames = ["..."];
//$this->handleFiles($this->jsonObject, $filePropertyNames);
$dataTypes = array(':uploadFile' => PDO::PARAM_LOB);
Caching
This caching solution functions in the following way. The first time the browser downloads the SPA it downloads the whole html. Next time it will ask the server if anything changed. If nothing changed it will load the page from the browser cache. In order to achieve this the following modifications needs to be done.
index.php
<?php
include "enableCache.php";
?>
<!doctype html>
<html lang="en">
...
nginxVirtualHostConfigFile
etag on;
expires 30d;
add_header Cache-Control private;
Set the expired value according to your wishes. Restart the Nginx.
The above code will tell the browser to cache the index page for 30 days before asking for a fresh version. If you wish to force the browser to invalidate its cache just use the terminal command touch index.php or overwrite it with via SFTP. That will modify its timestamp. Next time the browser checks if there is any change on the server it will receive yes and load the most recent page. This technique is usually done after the deployment of a new website version to production.
Functional testing
Because the website is an SPA, it is possible to execute functional testing without requiring to learn a new programming language. The tests can be triggered based on the domain name or query string param value e.g.
https://test.mysite.com https://test.mysite.com/?
test=true
Here is a small example on how to test the login page
test.js
routerModule.goToRoute("login");
$("#username").val("SomeValidUser")
$("#password").val("SomeValidPassword")
$("#btn-login").click()
...